Sunday, May 20, 2012

Engagement Portraits

Danny and I were asked to do engagement portraits for some friends of ours at ECU. So we headed back over to Greenville to take some photos on campus with them. We're not professionals by any means but we hope you like your pics, Amanda and Chris (and Sophie)! Here are a sampling of the photos:

And, of course, we caught a few eye rolls from Chris...

Thursday, March 8, 2012

When life gives you tapioca pearls...

Danny and I decided this last weekend to make bubble tea. Seemed simple enough, right?
We went to our local Asian market and after searching every single isle, we found the tapioca pearl section. While they had flavored varieties (strawberry, blueberry, etc.) we decided to start with the regular kind. We also bought green tea powder, coconut milk and...

Mochi! This is one of Danny's favorites. He snuck it into the basket without me even knowing. Sneaky kid.

Then came the biggest challenge. The straws! We searched the asian market, Target, Starbucks and Sheetz to try to find those jumbo straws they use for bubble tea. With no luck, we returned to the asian market the next day to buy some bubble tea so that we could re-use the straws. 


We made the tapioca pearls according to the directions on the back of the bag. They only require boiling- so easy! We then mixed the green tea powder, coconut milk, honey and ice in the blender. Put it all together and we made our own bubble tea! Wahoo! 

Friday, March 2, 2012

Line Drawing for the Artistically Challenged


Are you creatively driven but, you know, artistically challenged? Then this project if perfect for you! To create a framable line drawing all you need is a few materials and the ability to trace. Yes, I said trace. Ready to start? Let's go...


Pick your picture and print it out in black and white. Don't be like me and print it out on the fastest setting possible. Looking back at the picture I wish I had printed it at a little higher quality because I could have seen more detail.


1. Using a very fine sharpie trace all the lines on your printed photo.


2. Place tracing paper over your printed photo and trace the dark lines. At this point you have the freedom to include some lines while leaving others out. It's all up to you.


3. Using transfer paper (or my handy-dandy transfer-paper-less trick used on my string art tutorial) transfer your lines. If you have never used tracing paper before: You first place your good paper on the bottom. Then put your transfer paper, dark side down, over it. Lastly place your tracing paper on top. When you draw over the design you already drew it will be reproduced onto your good paper.


4. Draw over your transferred lines using sharpie pens.


You can keep your finished drawing simple (such as the drawing on the left) or, using a heavier sharpie add darker lines and areas (such as on the right).


Have fun experimenting with your new skill to create amazing line drawings!


Tuesday, February 21, 2012

Pin-Interest #2

Ready for another installment of Pin-Interest? Well, here we go! I have been ogling all the organization pins I've seen out there lately. Especially since I have zero organization skills myself. But I DO have crafting skills. So I thought I'd give it a try. I decided to replicate a measuring tool organizer (found here) and have provided you directions to make one as well. Let me tell you- it was easy AND only cost me $5.77.  What?! YES!


Follow the instructions below to make your own...


1. You will need to purchase wood and hooks. I went to Lowe's and bought a 1/2 x 2 x 36 inch piece of  pine. Did you know that the kind people of Lowe's will make 2 free cuts for you? Just head to the back of the lumber section (let the sound of electric machinery lead you) and ask the nice man to cut your wood into two 12 inch pieces. I also bought a box of 7/8 inch cup hooks.


2. Paint your wood pieces with standard acrylic paint. Then measure and place markings on your wood to indicate where each hook should be.


3. For this next step I painted the measurement words on using a white, sharpie paint pen and then outlined the words with a thin black sharpie. It you don't want all the hassle, buy number/letter stickers to use instead. I varnished my wood with a cheap acrylic glaze after I added the letters to give the piece a finished look. 


4. Screw in your hooks. If you have a drill I suggest using it! But, I  didn't so I just used my fingers and tried to put the hooks in as straight as possible!


Since I live in an apartment I used 3M removable stickies to hang the racks on the inside of my cabinet.


And there you have it! A finished rack for hanging your measuring tools!


Saturday, February 18, 2012

Photo Sewing

Time for another tutorial! Sewing on photos is a fun and unique way to embellish your favorite pictures. Plus it's really easy. Follow the instructions below to make your own!


Ready? Begin...

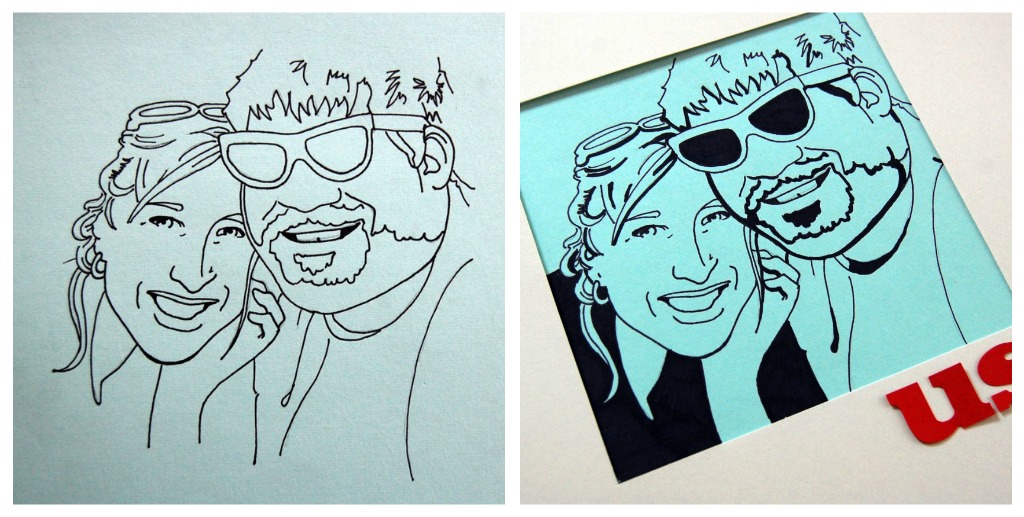
1. After you have your photo, draw your design or words onto the photo with a hard pencil. This will put enough of a dent onto the photo so that you can see it.


2. Now some may say that you need to use a foam board for this next step but we all have couches, right? Poke holes along your design using a needle. Place closer holes around curved edges.


3. The stitch that I used for my projects is a back stitch. To start, insert your threaded needle from the back of the picture in the second hole into your design. Pull the thread through, making sure to keep a short tail left at the back.


4. Then, go back down through the front of the picture through the first hole in your design. 


5. You have your first stitch! 


6. Continue in this way, coming up through the next empty hole, and going back down back through the hole before it. This is why it's called a backstitch!


You can create lots of unique designs onto your photos. Words, shapes, designs, what have you!


Hope you enjoyed this tutorial! Have a good weekend!

Wednesday, February 15, 2012

Try-It Tuesday

 I'm officially initiating a "Try-It Tuesday" series. I always want to try recipes that I pin or that I find in magazines. Well, now I am really going to. And I will be sharing these recipes and providing my opinion on them right here. Unfortunately, this post is coming one day late due to Valentine's Day- but you all were too busy yesterday to notice anyway, right?

For my first Try-It Tuesday Danny and I made lightened-up, baked mozzarella sticks from the marvelous Gina over at Skinny Taste (recipe found here). The recipe was super easy and uses plain old string cheese. The whole process, including baking, only took about 20 minutes.


The sticks got a little extra melty because we were too busy trying to get a picture of me spying on the baking sticks WITHOUT crazy eyes!


How amazingly delicious do they look?
So they ended up a success! Plus- I froze half of them that are already prepared and ready to go! Next time we've decided that we are going to use Weight Watcher's smoked cheese sticks for a different taste- yeah, we're fancy like that. (as evident by my Danny's stylish hair in this photo)

Tuesday, February 14, 2012

Valentine Puzzle Box

Need a last-minute, easy Valentine idea? I made this puzzle box using the instructions from my girl Martha (found here). All you need is one 12'' X 12'' piece of double sided scrapbooking paper. Don't be intimidated by the need for a "bone folder" in the supplies list. I couldn't find mine and used the side of a pen instead- worked great! Fold it up, draw some cute hearts, slip a note inside and you're done! I snuck mine in Danny's lunch bag for a mid-day Valentine surprise! 

Happy Valentine's Day, my friends!